There are many different ways to compost and worm farm. Anyone who is keeping biodegradable material out of landfill and allowing it to return to the Earth as nature intended is reducing their own carbon footprint. I say to you, well done! Composting and worm farming can be a journey of learning and it is my hope and aim to help you along the way by sharing some of what I have discovered over the years. I have been composting and worm farming now for over 30 years and I must admit that I am still finding out new things! The more you understand about what is going on inside your compost bin and/or worm farm, the more efficient it will be. It sounds funny to say, but I’m actually quite attached to the worms living in my worm farms! I feel a great sense of responsibility to make sure they are being cared for properly. They are living beings after all and I want them to be able to thrive in their environment. With all that being said, lets now take a closer look at what’s going on in the different levels the worm farm:
Level One/Top Level:
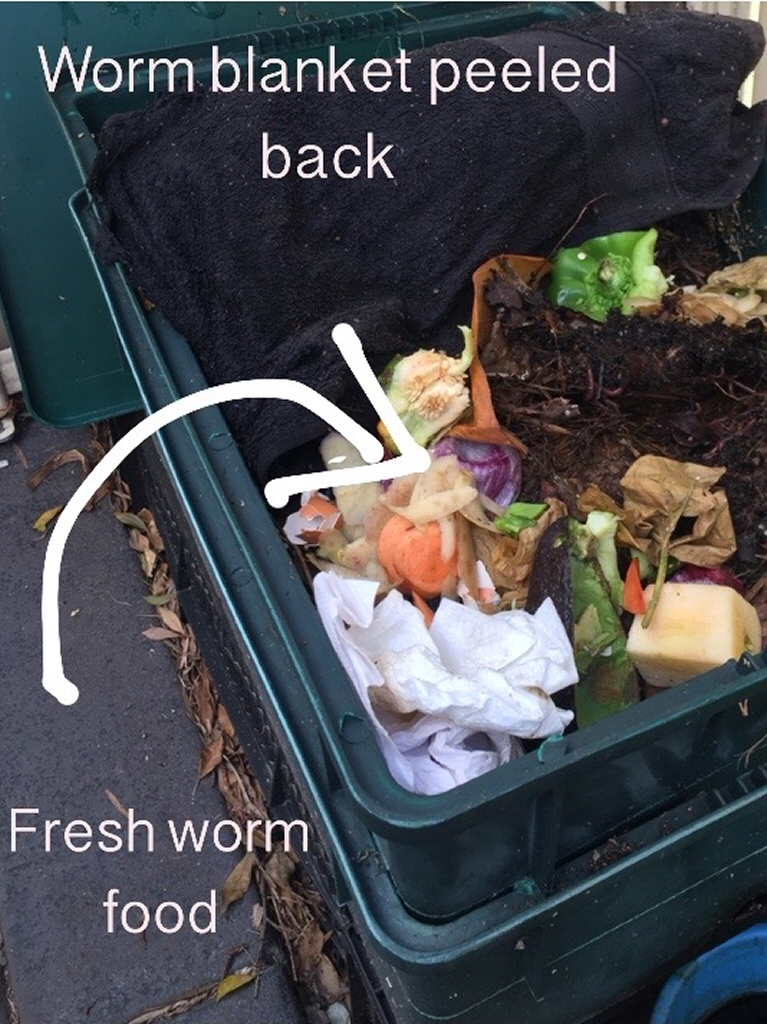
This is where you place all your biodegradable material for your worms to eat. You might like to think of this section of the worm farm as the kitchen and the place where the worms like to hang out best. If you have just purchased a brand new worm farm, the top layer is where you will put the bedding material. Bedding material can be shredded corrugated cardboard, old straw, expanding coir, peat moss, aged compost or aged horse/cow manure. You can use a combination of these things if you wish. The bedding material should be damp, but not soaking wet and will provide the worms something to move about in while the worm farm is establishing. While your worm farm is establishing, only feed the worms small amounts of scraps as a time. Feed your worms things like fruit, and vegetable scraps, coffee grounds, tea leaves, egg shells, paper towel, leaf litter and cardboard. It is important that you feed your worms a balance of “greens” and “browns.” Let’s take a closer look at what is meant by this:
Greens: All the fresh kitchen scraps that are nutrient rich. Items such as fruit and vegetable scraps, tea leaves, grass clippings and coffee grounds. These items are the ones that tend to heat up a compost pile because they help the microorganisms grow and multiply quickly.
Browns: Are things like paper, cardboard, dried leaves and egg shells, which contain more carbon to help keep the worm farm balanced.
Placing both greens and browns into the top layer will keep the worms very happy. If you notice your worm farm becoming too damp, placing some carbon rich material into the top layer will correct this. It is also important to add a bit of “grit” to the worm farm every now and again. Just a small handful of dirt, sand or soil will do the trick. The grit will help the worms digest their food.
The top layer of the worm farm is where the worms live and breed, so it is important to keep things moist so the worms don’t dry out, but still airy so the worms can breathe. A worm blanket is a wonderful addition to the top layer of the worm farm. It gives the worms a perfect place to lay their eggs. A worm blanket can be any material made from natural fibres such as wool or cotton, which will break down as time goes on. You can use an old cotton towel, a section of an old wool blanket, or you can purchase a commercial worm blanket from all Australian company, Tumbleweed. It is important to keep your worm blanket damp the blanket damp at all times to help the hatching of your baby worms. The final component to the top level of the worm farm is the lid. The lid will keep unwanted pests out and also keep the worms in!
The Middle Level or Level/s:
 Your worm farm may have one middle level, or multiple middle levels, depending on personal preference and also how much organic material is being processed through the worm farm. The middle level/s is where everything gets broken down further and where you end up with a thick layer of worm castings. If you have a couple of bottom layers, the bottom one should have the least worms and the most broken down castings, which will be a thick dark brown/black, rich matter. This rich matter is what you can go on to use in your garden, or make your own potting mix once you remove the worms. In most commercial worm farms, the worms can move freely between each level of the farm, so do not worry if you find worms in the middle level/s of the worm farm. Once the castings are well broken down most worms will tend to move to higher levels towards the source of food. If you’re interested in learning a few different methods to harvest your worm castings, follow this link >>>>
Bottom Level:
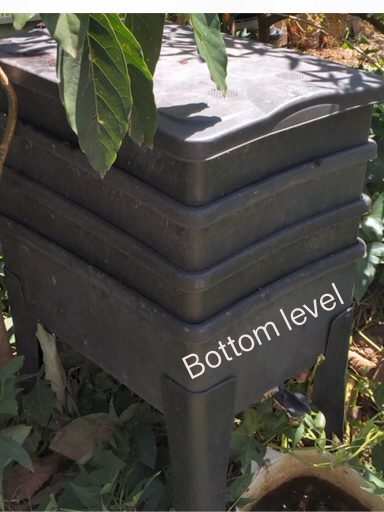
The bottom level of the worm farm is where the liquid collects. When you open the lid of your worm farm and and pour water through, it moves through each layer/level. As it percolates through the middle layer/s, the water collects beneficial microbes and nutrients. The water turns into a brown liquid, which I like to call “worm tea.” There are many different names for this liquid, so you can call it which ever one you like best! the colour depends on how much water you put through your worm farm and how much worm castings it’s travelling though. If you end up with a very dark brown liquid, then dilute it before using it on your plants. It should be diluted so that the colour can be likened to that of weak tea. Worm tea is a fantastic liquid fertiliser and it comes straight out of your worm farm for free! Some worm farms have a tap on the bottom level and worm tea can be collected when ever it is needed for fertilising plants. Other worm farms simply have a hole or an outlet for from which the worm tea flows freely. It’s useful to have a bucket or a container underneath the outlet to catch the worm tea as it flows from the worm farm. If you pour water through your worm farm and it doesn’t flow out of the outlet, or come out of the tap when it’s in an open position, it’s important to check for blockages. If your outlet or tap is blocked it can cause flooding in the worm farm and the worms may drown. The water must flow freely from the top layer, through to the bottom and then out of the tap/outlet to create ideal living conditions for the worms. I have found it useful to prop my worm farms up slightly at the back to allow all the water to move towards the outlet. It is quite ok to allow some liquid to collect in the bottom tray, especially if you have a Tumbleweed worm farm. Their worm farms have a hump in the bottom level so that the worms don’t drown in the liquid. They can climb up the hump and back into the middle level of the worm farm if they find themselves in too much liquid.

For lots of information on home growing vegies, worm farming and lots more, check out the book “Grow Your Own”….buy it here>>>>